Experience the spatial illusion with a 1/3 staggered tile pattern shower that uplifts your bathroom to a next-level, amalgamation dance of geometry and precision in a single pattern. Apart from the aesthetic grace, this particular shower design offers a sense of flow and openness with dynamic textures.
Many people encounter the risk of mold formation and faded grout, but staggered tile patterns cut all the hazards. Indeed, it is a long-lasting investment. You can play with diverse designs and styles, be it monochromatic themes or pop of colors according to your fondness. This statement piece is sustainable and slight unevenness isn’t noticeable on the walls, making it easy to mount.
This article peels back the layers of this intricate design, revealing not only its aesthetic appeal but also redefining the very space it occupies, elevating your daily ritual into a wonderful experience. So, jiggle hands with us and make your design stand out!
Why Choose a 1/3 Staggered Tile Pattern?
Visually attractive
1/3 staggered form adds an eye-capturing element that is captivating and enhances the beauty of any space. Its timeless aesthetic appearance makes it more visually appealing and increases the interest of viewers.
Hiding all the imperfections of the wall
This type of tile placement conceals uneven grout lines that require less precision and can avoid any bumpy appearance. By camouflaging the irregularities, a 1/3 staggered design is an easy choice that gives depth and dimension to the wall.
Design versatility for any type of home wall
1/3 Running bond is versatile in terms of color, themes, patterns, texters, shapes, and sizes as per your customizations and preferences. Any selection of tiles you choose can be accommodated in a 1/3 staggered tile layout.
Complements and integrates other tile designs
For a more cohesive look, select patterns that complement the whole theme and color palette of the room, such as contrasting color edges and gradual transitions. For a more uniform appearance, the grout should be evenly spread offering visual hierarchy and seamless blend among all the elements.
Best Practices for Installation of 1/3 Staggered Tile Pattern
The key to a perfect installation of tiles is precise measurements with expert techniques. Here are some tools and materials for the best results.
List of all the tools and materials required
Basic tools required for the installation process are a tile cutter, wet saw, grout sponge, notched trowel, tile nippers, tile spacers, bucket and mixing drill rubber mallet, etc. Materials that are necessary for creating a straight pattern include tiles, particularly porcelain tile, thin-set mortar, tile sealer, caulk, adhesives, etc.
Preparing the wall surface for a seamless blend and perfect-looking tile pattern
Firstly, clear and prepare the surface for tile placement. You need a flat surface, and for that clean any dirt or residue before placing any material on top. Use leveling compound to level for smooth and uniform application. This step prevents any dips or bumps. Let the compound self-dry completely before sanding. Make sure to sand the compound to flatten the surface with sandpaper. You can also apply primer to make the surface ready for tile installation after its entire dryness that prevents any mold formation.
Take your time to plan the best layout
Measure the area on which the tile has to be placed. Decide the grout spacing between the tile pattern. Find a center to start from. After adjusting the tile placement make sure the edges are neatly cut leaving the expansion joints for any expansion after drying. Make sure the adjustment is aligned and gives a consistent and professional appearance.
Carefully mix and apply the tile adhesive
After deciding the suitable adhesive for your tile’s material, mix the adhesive in an accurate ratio with tools. Prepare the surface to prevent any future breakage, apply the adhesive with a flattening tool, and let it dry. At the end set the tiles on top.
Setting the tiles in a particular fashion
Once the surface is prepared, plan the required layout as per your desire. Start placing tiles from the center by taking one-third of the offsets from the first row. Cut the extra tiles that exceed the required layout plan for a unified appearance.
When needed cut the tiles to fit in the wall
Make curved or straight cuts as required to your design after spacing the tiles. Make sure the edge of tile is cut flawlessly and finished with grout after installation of snapped tiles.
Do not forget to grout the tiles
After applying the tile, to give a finished look, grout should be placed in the ends. After scraping any excess grout filling, allow it to cure, and if preferred seal the grout.
Finish it all up with a quality grout sealer
For better results, a quality grout sealer is used directly onto the grout mixture. After penetration of sealer for several minutes, remove the excess and add finishing touches if required such as grout haze removal, polishing, and maintenance. This gives the straight pattern a uniform and blended look.
of 07
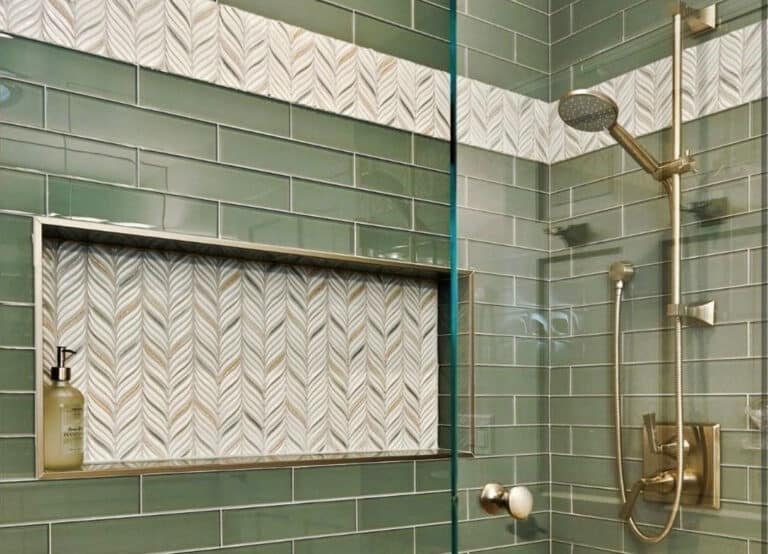
Vibrant Pinkish Beauty With a 1/3 Staggered Tile Pattern Shower

This green and pink color combo adds a brightening effect with hints of ecstatic flairs. It enhances the calm feel with its subtle yet refreshing color contrasts. A flawless ratio between pink 1/3 staggered tile pattern Shower, rose gold fixtures, pearl white shelves, and rich green cabinets catches viewers’ senses and attaches them to the entire insight closely.
of 07
Minimalistic Interior Approach with Horizontal Staggered Tile

This horizontal staggered tile is an astonishing illustration of minimalism which refers to ‘’less is more’’. It has highlighting contrasts of snow-white tiles with matte fixtures for a neat finish along with a sparkle with golden and wooden ornamentation. Sleek and streamlined fixtures or accents are preferred for more delicate and soft visuals.
of 07
A Pop of Dark Colors with a Staggered 1/3 Offset Tile Pattern

A staggered 1/3 offset tile pattern with a bold color choice screams vibrancy. A dauntless selection of emerald green tiles with bright white colored hardwood and golden fittings along with supreme biophilic wallpapers announces a luxurious lifestyle. Matte tile flooring with matte fixtures makes it an outstanding combination.

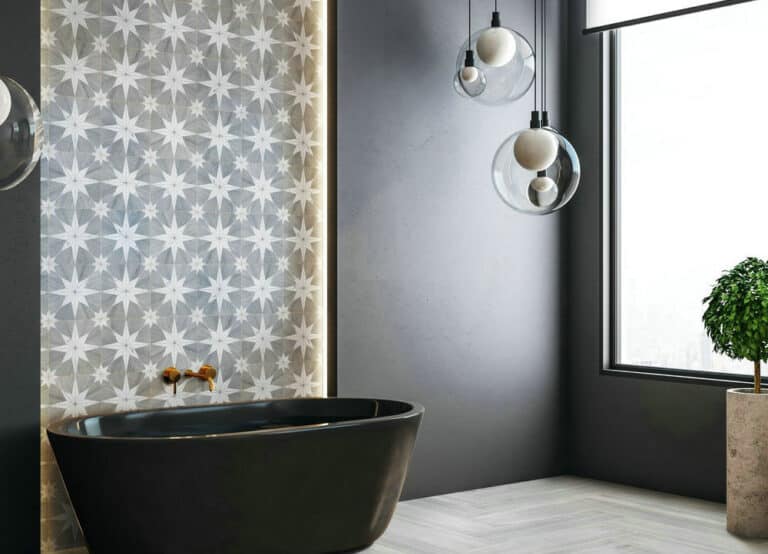
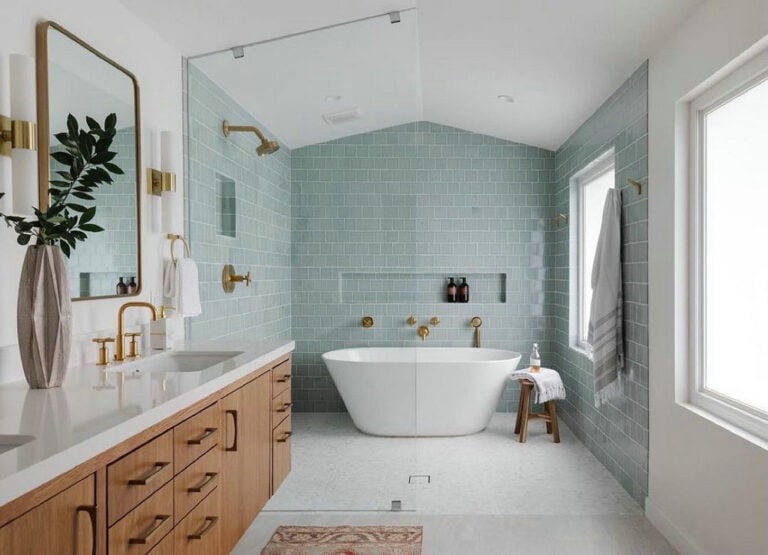
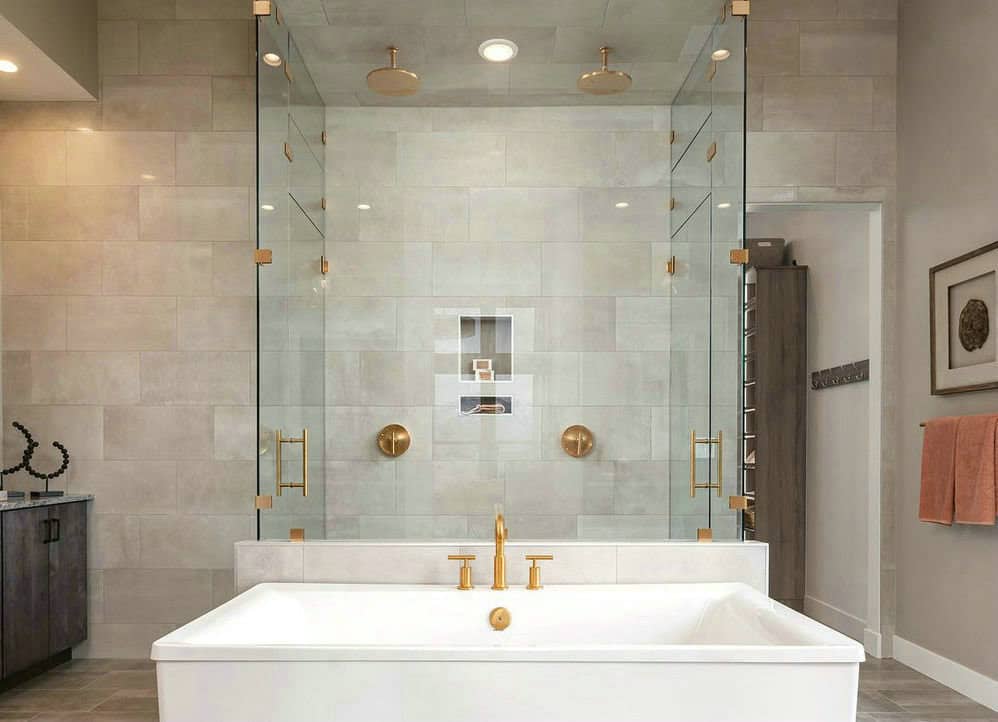
An example of a chic master bath design is this maple-wood-colored 1/3 staggered tile pattern. Appears like someone would undeniably say aesthetic for this wonderful freestanding tub style alongside the enclosed shower adjoined at the back. The ashy wooden and coppery details link the whole theme with grace. In addition to this, matte black ornamentation will give this theme a complete look.
of 07
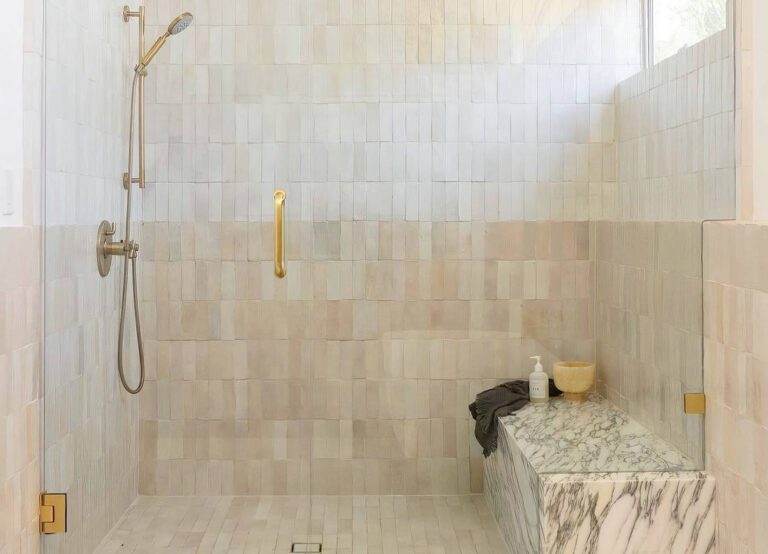
The Shower Staggered 12x24 Tile Pattern Is a Dreamy Perfection

The Shower Staggered 12×24 Tile Pattern in Bianco Dolomiti marble always gives a feeling of openness and cleanliness. An effortless beauty vision is achieved by rusty fixtures along with the larger tiles and a neat floor. You can never go wrong with a simple approach to any interior for sure. Straight setting and edges throughout the compositions give it minimalistic vibes.
of 07
Tropical 1/3 Tile Layout That Connects You Well with Nature

A coastal approach interior with a blueish gray 1/3 tile layout alongside muddy pink cabinets is mesmerizing. A white touch to the basin and flooring binds together with hints of brassy gold for the handles and tools. Pineapple wallpaper is the star of the show that completes the tropical aesthetic seamlessly. It gives a feel of a cool breeze with slight sun warmth along with the freshness of nature.

A very stylish choice for your bathroom is this white tile staggered pattern in 1/3. The whole theme revolves around muted tones of gray and white that make it put together without any disturbance of different colors. From original gray grout to pearl-white countertops and dark gray bathroom accents, they give sleekness and elegance. A similar toned color palette appears to be a luxury interior.
FAQs
What Is a Staggered Tile Pattern?
A staggered tile pattern or offset pattern is referred to as the placement of tiles in such a way that the tile edge is placed to the center or 1/3rd of the preceding tile. This pattern can be horizontal or vertical depending on the preference. Some prefer lining up the corner of the following tile, halfway or 50/50 to the center of the previously done tile row or column and some prefer by taking one-third offsets.
Should Shower Tiles Be Staggered?
Staggered tiles are a choice for those who admire traditions and classic elements. Staggered tiles have a feel of vintage and are timeless in every era. It’s like a rhythmic pattern that emphasizes textures and movements. Moreover, there are fewer lippage risks in staggered tiles with easy installation than in stacked subway tiles.
Why Lay Tiles in the Third?
Taking the brick pattern of the tiles not only creates more texture but also increases the strength by distributing stress evenly throughout the pattern. It lessens the probability of getting moved and makes it easy to install. It allows room for amendments if there is any subject of tile warping or uneven tile sizes making it budget friendly additionally.